Contents
How to Replace a Lamp Socket Step-by-Step Guide

If you have a lamp that is not working properly, it may be time to replace the lamp socket. The lamp socket is the part of the lamp that holds the bulb and connects it to the wiring. Over time, the socket can become worn or damaged, causing the lamp to flicker or not turn on at all. Fortunately, replacing a lamp socket is a relatively simple process that can be done in just a few steps.
The first step in replacing a lamp socket is to make sure the lamp is unplugged from the electric source. This is important for your safety and to avoid any potential electrical shocks. Once the lamp is unplugged, you can begin by removing the bulb from the socket. This is usually done by turning the bulb counterclockwise until it is loose enough to be removed by hand.
Next, you will need to remove the socket from the lamp fixture. This can usually be done by unscrewing the socket from the base of the lamp. Use a screwdriver or pliers to loosen and remove the screws or nuts that are holding the socket in place. Once the screws or nuts are removed, you should be able to easily pull the socket out of the lamp fixture.
After removing the old socket, it is time to install the new one. Take the new socket and insert it into the lamp fixture, making sure it is securely in place. Use a screwdriver or pliers to tighten the screws or nuts to hold the socket in place. Once the new socket is installed, you can then insert a new bulb into the socket by turning it clockwise until it is securely in place.
Finally, plug the lamp back into the electric source and test the new socket. Turn the lamp on and off to make sure it is working properly. If the lamp still does not turn on or if you experience any other issues, it may be necessary to check the wiring or consult a professional electrician.
Overview of Lamp Socket Replacement

Replacing a lamp socket is a simple and straightforward process that can be done by anyone with basic knowledge of electrical work. The lamp socket is the part of the lamp that holds the light bulb and connects it to the electrical wiring in the fixture.
Over time, lamp sockets can become worn out or damaged, resulting in issues such as flickering lights or a bulb that won’t stay in place. When this happens, it’s important to replace the socket to ensure proper functioning and safety.
To replace a lamp socket, you will need a few basic tools, including a screwdriver and wire cutters. It’s also important to make sure the lamp is unplugged and turned off before beginning any work.
Here are the general steps to replace a lamp socket:
- Remove the light bulb and lampshade from the lamp.
- Unscrew the socket cap, which is the part that holds the socket in place.
- Disconnect the wiring from the old socket. This may involve unscrewing wire nuts or cutting and stripping the wires.
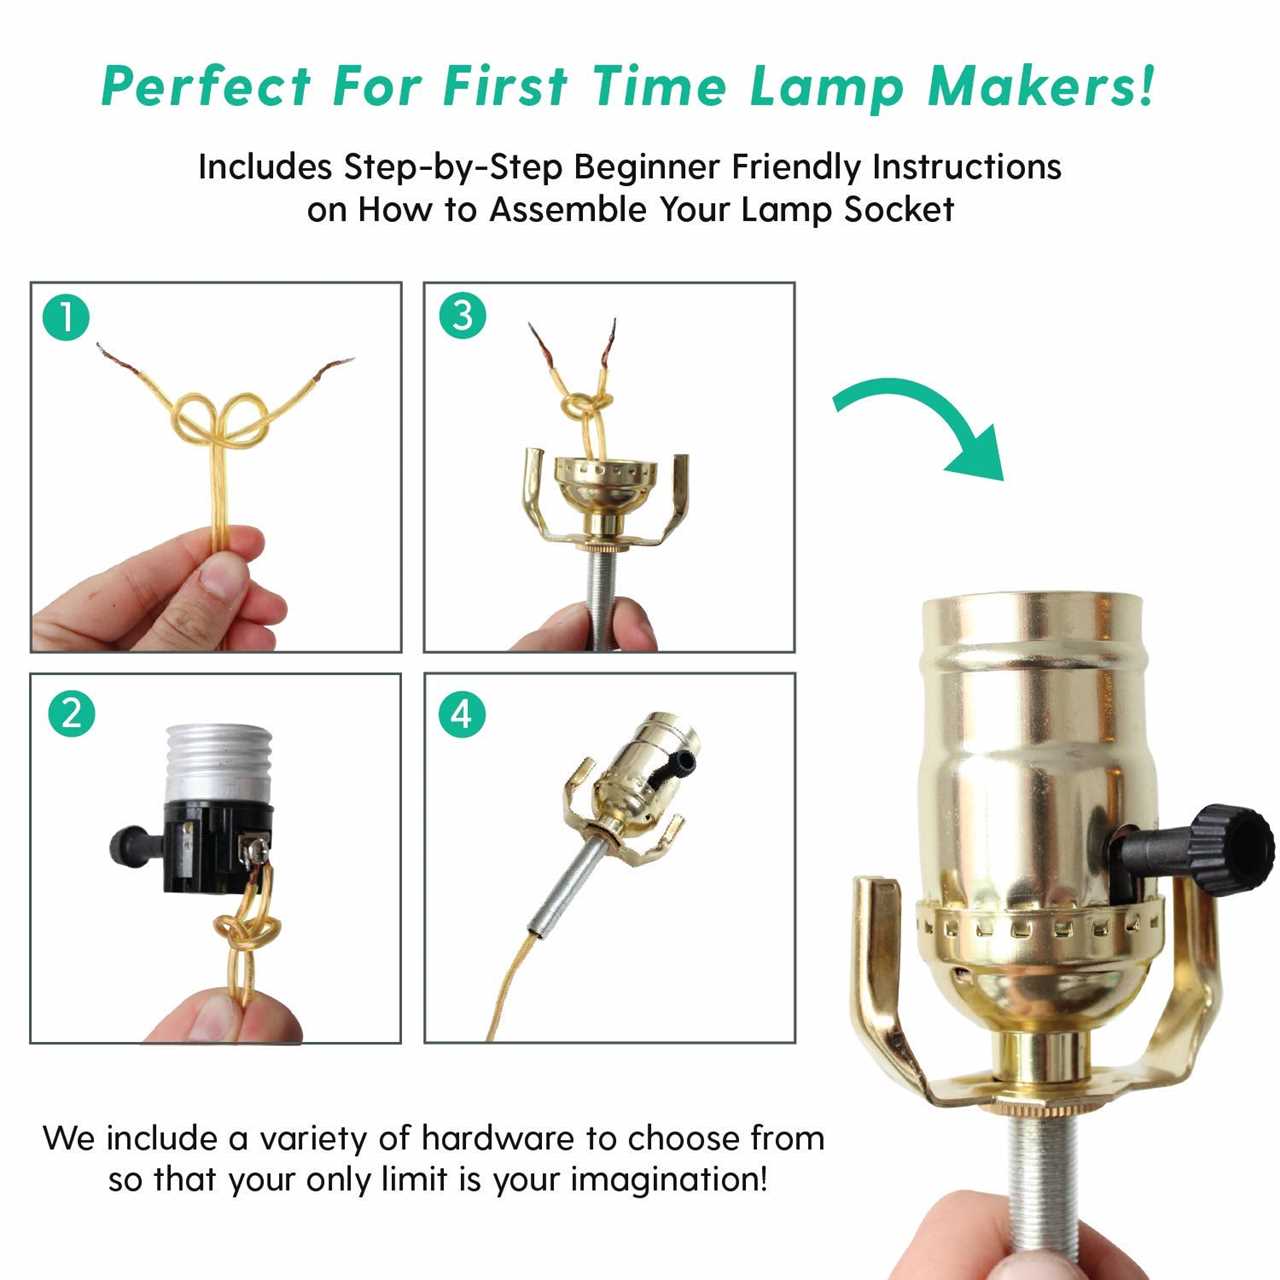
- Attach the wiring to the new socket, following the manufacturer’s instructions.
- Screw the new socket into place using the socket cap.
- Reinstall the light bulb and lampshade.
It’s important to note that the specific steps may vary depending on the design of the lamp and socket. Always refer to the manufacturer’s instructions for your specific lamp model.
By following these steps and taking the necessary precautions, you can easily replace a lamp socket and restore proper light function to your fixture.
Tools and Materials Needed
Before you begin replacing a lamp socket, make sure you have the following tools and materials:
- Light bulb: Make sure you have a new light bulb on hand to replace the old one.
- Screwdriver: You will need a screwdriver to remove any screws holding the lamp socket in place.
- Lamp socket: Purchase a new lamp socket that is compatible with your specific lamp model.
- Electrical tape: Electrical tape will be used to secure any loose wiring.
- Wire cutters/strippers: These tools will be necessary if you need to cut or strip any wires during the replacement process.
- Wire connectors: Wire connectors are used to connect and secure wires together.
- Electrical tester: An electrical tester is used to check for voltage and ensure the lamp is properly wired.
- Step ladder: Depending on the height of your lamp, you may need a step ladder to reach the socket.
Having these tools and materials ready before you start will ensure a smooth and efficient lamp socket replacement process.
Required Tools

Before you begin the process of replacing a lamp socket, you will need the following tools:
- A screwdriver
- A new lamp socket
- Wire strippers
- Electrical tape
- A wire cutter
- A voltage tester
These tools are necessary to safely replace the lamp socket and ensure that the wiring is properly connected. The screwdriver will be used to remove the fixture and the old socket. The wire strippers and wire cutter will be used to prepare the wiring for the new socket. The electrical tape will be used to secure the connections and prevent any exposed wires. Lastly, the voltage tester will be used to ensure that the power is off before beginning the replacement process.
Required Materials

To replace a lamp socket, you will need the following materials:
- Electric lamp socket: This is the component that connects the light bulb to the electrical wiring in the lamp fixture.
- Screwdriver: A screwdriver will be needed to remove any screws that are holding the lamp socket in place.
- Bulb: Before replacing the lamp socket, make sure to remove the bulb from the socket to avoid any accidents.
- Light fixture: This is the entire structure that holds the lamp socket, bulb, and other components together. It may need to be disassembled to access the socket.
- Wiring: Depending on the condition of the existing wiring, you may need to replace it as well.
Make sure to gather all the necessary materials before starting the replacement process to ensure a smooth and efficient repair.
Step 1: Preparation
Before you begin to replace a lamp socket, it is important to ensure your safety and gather all the necessary tools and materials. Follow these steps to prepare for the task:
- Turn off the power: Before you start working on the wiring of the lamp, make sure to turn off the power supply to the light fixture. This will prevent any electrical accidents and keep you safe.
- Remove the bulb: Unscrew the bulb from the lamp socket and set it aside in a safe place. This will give you better access to the socket and prevent any damage to the bulb.
- Disconnect the lamp: If the lamp is plugged into an outlet, unplug it to avoid any electric shocks. If the lamp is hardwired into the ceiling or wall, turn off the circuit breaker that controls the light fixture.
- Gather the necessary tools and materials: Make sure you have all the tools and materials you need for the replacement. This may include a screwdriver, wire cutters, wire strippers, a new lamp socket, and electrical tape.
- Inspect the socket: Take a close look at the existing lamp socket to identify any signs of damage or wear. If the socket is cracked, discolored, or shows signs of burning, it is important to replace it to prevent any electrical hazards.
By following these preparation steps, you will ensure a safe and efficient lamp socket replacement process. Remember to always prioritize your safety when working with electrical fixtures.
Gather Necessary Tools and Materials

Before you begin the process of replacing a lamp socket, it is important to gather all the necessary tools and materials. Having everything prepared beforehand will make the process much smoother and more efficient.
Here is a list of the tools and materials you will need:
- Replacement socket: Make sure to purchase a socket that is compatible with your lamp fixture and bulb.
- Screwdriver: You will need a screwdriver to remove any screws holding the socket in place.
- Wire cutters/strippers: These tools will be necessary for cutting and stripping the electric wiring.
- Electrical tape: Electrical tape will be used to secure the wires and ensure a safe connection.
- Wire connectors: Wire connectors are necessary for joining the wires together securely.
It is important to have these tools and materials on hand before attempting to replace a lamp socket. This will help ensure that you have everything you need and can complete the task without any interruptions.
Turn Off Power to the Lamp

Before you begin replacing the lamp socket, it’s important to turn off the power to the lamp. This step is crucial to ensure your safety while working with electric fixtures.
Start by unplugging the lamp from the power outlet. If the lamp is hardwired, locate the circuit breaker that controls the power to the fixture and switch it off. This will prevent any accidental electric shock while you replace the socket.
If you’re unsure which circuit breaker controls the lamp, you can also turn off the main power supply to your home. This will ensure that no electricity is flowing to the lamp during the replacement process.
It’s important to note that even if the lamp is turned off, there may still be residual electricity in the socket. To be extra cautious, use a non-contact voltage tester to double-check that there is no power running through the socket before proceeding.
Remember, safety should always be your top priority when working with electrical fixtures. Take the necessary precautions and ensure that the power is completely turned off before you begin replacing the lamp socket.
Step 2: Remove Old Lamp Socket
To replace a lamp socket, you first need to remove the old one. Follow these steps to safely remove the old lamp socket:
- Turn off the power: Before you begin, make sure the electric power to the light fixture is turned off. This will prevent any accidents or electrical shocks.
- Unscrew the light bulb: Remove the light bulb from the socket by turning it counterclockwise. Set it aside in a safe place.
- Disconnect the wiring: Carefully disconnect the wiring from the old lamp socket. If the wires are connected using screws, use a screwdriver to loosen and remove the screws. If the wires are connected using push-in connectors, gently pull them apart.
- Remove the old socket: Once the wiring is disconnected, you can remove the old socket from the fixture. Depending on the type of socket, it may be held in place with screws or clips. Use a screwdriver or your fingers to loosen and remove any screws or clips.
By following these steps, you can safely remove the old lamp socket and prepare for the installation of a new one.
Unscrew the Bulb
To begin replacing the lamp socket, the first step is to unscrew the bulb from the fixture. This will ensure that there is no electric current running through the wiring, making it safe to work on.
Before unscrewing the bulb, make sure the lamp is turned off and unplugged from the power source. This will prevent any accidents or electric shocks.
Once the lamp is safely disconnected, hold the bulb firmly and twist it counterclockwise until it loosens and can be removed from the socket. Be careful not to apply too much pressure, as this could cause the bulb to break.
Set the unscrewed bulb aside in a safe place, away from the work area, to avoid any accidental damage.
Disconnect the Wires

Before replacing a lamp socket, it is important to disconnect the power supply to ensure your safety. Follow these steps to disconnect the wires:
- Turn off the lamp and unplug it from the electrical outlet.
- If the lamp is still hot, allow it to cool down before proceeding.
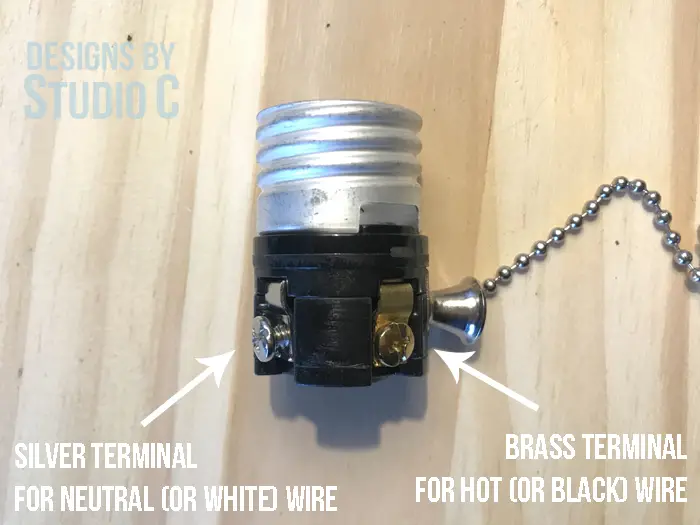
- Inspect the lamp fixture and locate the wiring connected to the socket. The wiring usually consists of a black (hot) wire and a white (neutral) wire.
- Identify the socket wires. The socket usually has two wires attached to it: a hot wire and a neutral wire.
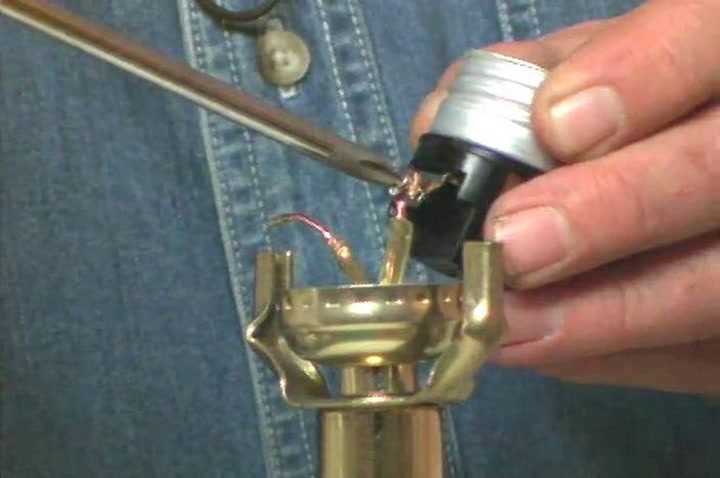
- Using a screwdriver or pliers, loosen the screws or nuts that secure the wires to the socket. Be careful not to damage the wires.
- Once the screws or nuts are loosened, gently pull the wires away from the socket.
After disconnecting the wires, you are ready to replace the lamp socket with a new one. Make sure to follow the manufacturer’s instructions and consult a professional electrician if you are unsure about any step of the process.
Video:How to Replace a Lamp Socket Step-by-Step Guide
How to replace a lamp socket
Hello, I am Beverly J. Sanders, the voice behind the diverse articles you come across on styves.co.za. My passion lies in exploring the nuances of home improvement and sharing tips that can help you transform your living space into a haven of comfort and style. From the latest trends in home decor to practical cleaning advice, I cover a broad spectrum of topics to cater to a wide variety of interests.
In my recent works, I have delved into the advantages of incorporating a horizontal Murphy bed into your home to save space without compromising on design and functionality. I also explored the benefits of having a free-standing electric fireplace that not only adds warmth to your home but also brings a sleek and modern design to any living space. My articles are a rich resource, offering insights into different products and home improvement strategies that can enhance the quality of your life.
I believe in the power of details; a belief that reflects in my comprehensive guides where I discuss even the overlooked aspects of home decor, such as the impact of baseboard trim in enhancing the overall look and feel of your home. I am constantly on the lookout for innovative solutions and products that can add value to your home and life.
Join me in my exploration as I continue to bring you the latest trends, tips, and insights in the home improvement world. Let’s create a home that is not just a place to live, but a reflection of style and personality.