Contents
Tankless Water Heater Flush How to Clean and Maintain Your Unit

Regular maintenance is essential for keeping your tankless water heater running efficiently and extending its lifespan. One important maintenance task is flushing the unit to remove any mineral deposits or sediment that can build up over time. In this article, we will guide you through the process of flushing your tankless water heater to ensure optimal performance.
Flushing your tankless water heater involves draining and cleaning the internal components of the unit. Over time, minerals and sediment can accumulate in the heat exchanger and other parts, reducing the heater’s efficiency and potentially causing damage. Flushing your heater helps to remove these deposits and maintain its efficiency.
Before you begin flushing your tankless water heater, it’s important to turn off the power and water supply to the unit. This will ensure your safety and prevent any damage to the heater. Once the power and water supply are turned off, you can proceed with the flushing process.
To flush your tankless water heater, you will need a bucket, a submersible pump, a hose, and white vinegar. The vinegar will help dissolve the mineral deposits and clean the internal components of the heater. Simply connect the pump and hose to the heater’s drain valve, place the other end of the hose into the bucket, and pour vinegar into the bucket. Open the drain valve and let the vinegar flow through the heater, flushing out any deposits. Repeat this process until the vinegar runs clear.
Tankless Water Heater Flush

A tankless water heater is a popular choice for many homeowners due to its energy efficiency and continuous hot water supply. However, like any other appliance, it requires regular maintenance to ensure its optimal performance. One important maintenance task for a tankless water heater is a flush.
A tankless water heater flush involves removing mineral deposits and other sediments that can build up inside the unit over time. These deposits can reduce the efficiency of the heater and potentially cause damage if left untreated.
To perform a tankless water heater flush, you will need the following materials:
- A bucket or a drain pan
- A submersible pump
- Vinegar or a descaling solution
- A hose with a connection to the heater
Here is a step-by-step guide on how to flush your tankless water heater:
- Turn off the power supply to the heater. This is usually done by flipping the switch on the circuit breaker.
- Close the hot water valves on all faucets and appliances connected to the heater.
- Attach the submersible pump to the hose and place the pump in a bucket or drain pan.
- Connect the other end of the hose to the cold water inlet valve of the heater.
- Open the hot water outlet valve on the heater.
- Pour vinegar or a descaling solution into the bucket or drain pan.
- Turn on the submersible pump to circulate the vinegar or descaling solution through the heater.
- Let the solution circulate for about 30 minutes to an hour, depending on the severity of the mineral deposits.
- After the designated time, turn off the submersible pump and close the hot water outlet valve.
- Disconnect the hose from the cold water inlet valve and remove the submersible pump.
- Open the cold water inlet valve to flush out any remaining solution.
- Close the cold water inlet valve and reconnect the hose to the heater.
- Open all hot water valves on faucets and appliances connected to the heater to flush out any remaining solution.
- Finally, turn on the power supply to the heater and check for any leaks or unusual noises.
Performing a tankless water heater flush at least once a year can help prolong the lifespan of your unit and maintain its efficiency. It is also recommended to consult the manufacturer’s instructions for specific guidelines on flushing your particular model.
Note: If you are unsure or uncomfortable performing a tankless water heater flush yourself, it is recommended to contact a professional plumber who can assist you.
Why is it important?

Regular maintenance and cleaning of your tankless water heater is important for several reasons:
- Efficiency: Over time, mineral deposits and sediment can build up inside the unit, reducing its efficiency. Flushing the water heater helps to remove these deposits and ensure that it continues to heat water efficiently.
- Longevity: By regularly cleaning and maintaining your tankless water heater, you can extend its lifespan. Removing mineral deposits and sediment helps to prevent corrosion and other damage that can lead to premature failure of the unit.
- Performance: A clean water heater will provide better performance, delivering hot water quickly and consistently. Flushing the unit helps to remove any blockages or obstructions that can impede the flow of water and reduce performance.
- Health and safety: Over time, bacteria and other microorganisms can grow inside the water heater. Flushing the unit helps to remove these contaminants and ensure that you have clean, safe water for bathing, cooking, and other household needs.
By regularly cleaning and maintaining your tankless water heater, you can enjoy all of these benefits and ensure that your unit operates at its best for years to come.
Benefits of regular maintenance

Regular maintenance of your tankless water heater is crucial for ensuring its optimal performance and longevity. Here are some key benefits of regularly maintaining your tankless water heater:
- Improved Efficiency: Regular maintenance, including flushing, helps to remove mineral deposits and debris that can accumulate in the unit over time. This allows the heater to operate more efficiently, resulting in lower energy consumption and reduced utility bills.
- Extended Lifespan: By regularly flushing and cleaning your tankless water heater, you can prevent the buildup of scale and sediment, which can lead to corrosion and damage to the unit. This helps to extend its lifespan and avoid costly repairs or premature replacement.
- Consistent Performance: Flushing the tankless water heater removes any blockages or obstructions in the water flow, ensuring a consistent and reliable supply of hot water. This is especially important in households with high hot water demand or in commercial settings.
- Improved Water Quality: Over time, mineral deposits and sediment can affect the quality of the hot water produced by the tankless water heater. Regular maintenance helps to maintain clean and fresh water, free from any unpleasant odors or tastes.
- Prevention of Malfunctions: Regular maintenance allows you to identify and address any potential issues or malfunctions before they become major problems. This can help you avoid unexpected breakdowns and costly repairs.
Overall, regular maintenance of your tankless water heater is essential for optimal performance, energy efficiency, and longevity. It ensures a continuous supply of clean and hot water while helping you save money on energy bills and avoid costly repairs.
Step-by-step guide

Regular maintenance and cleaning of your tankless water heater is crucial to ensure its optimal performance and longevity. Follow these steps to flush and clean your tankless water heater:
- Turn off the power: Before starting any maintenance, make sure to turn off the power supply to the tankless water heater. This will prevent any accidents or electrical shocks.
- Turn off the water supply: Locate the water shut-off valve and turn it off to stop the flow of water into the tankless water heater.
- Drain the water heater: Connect a garden hose to the drain valve of the tankless water heater. Place the other end of the hose in a suitable drainage area, such as a floor drain or outside. Open the drain valve and let the water flow out completely. This will remove any sediment or debris that may have accumulated in the unit.
- Flush the heater: Close the drain valve and remove the garden hose. Connect another garden hose to the cold water inlet valve. Place the other end of the hose in a bucket or container. Open the cold water inlet valve and let the water flow through the tankless water heater for a few minutes. This will help flush out any remaining sediment or debris.
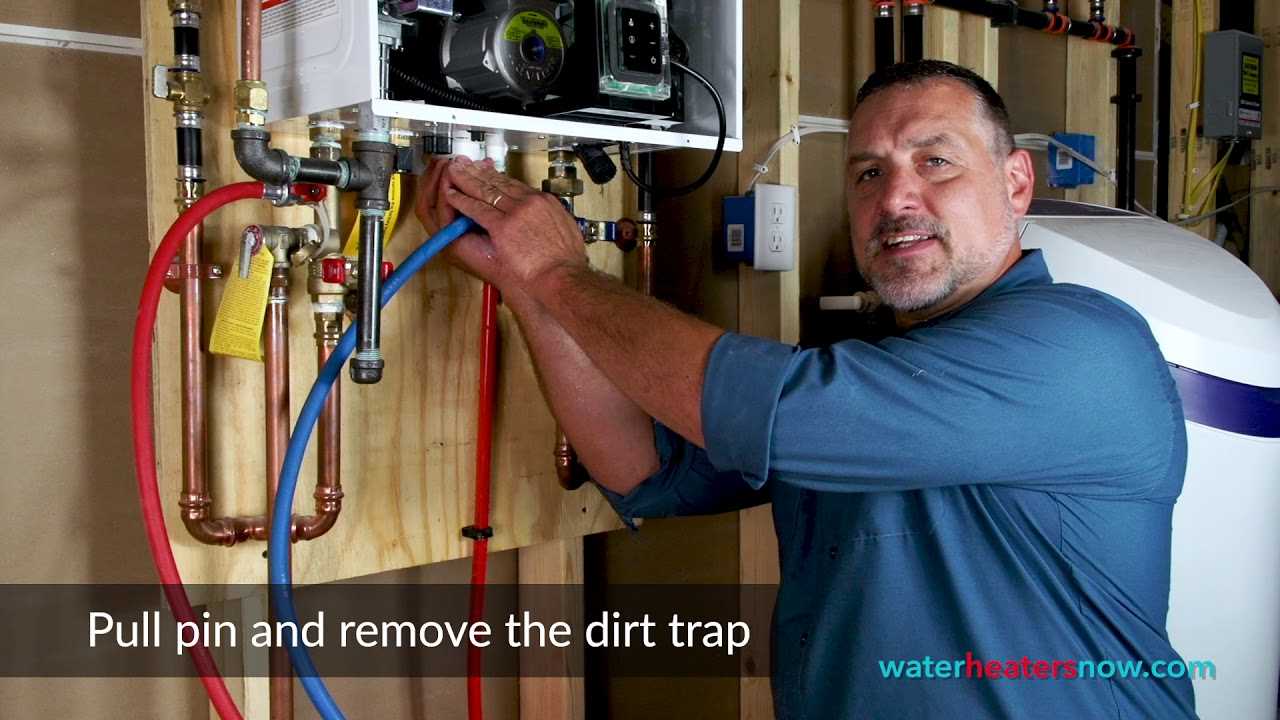
- Inspect and clean the filter: Locate the inlet filter on the tankless water heater. Remove the filter and clean it using a soft brush or by rinsing it with water. Make sure to remove any dirt or debris that may have accumulated on the filter.
- Reassemble and turn on the water supply: Once the filter is clean, reassemble it and make sure it is securely in place. Turn on the water supply by opening the shut-off valve.
- Restore power: Finally, restore the power supply to the tankless water heater by turning on the appropriate breaker or switch.
- Run a test: To ensure everything is working properly, turn on a hot water faucet and check if hot water is flowing without any issues. If there are any problems, double-check the steps and make sure everything is properly connected and in working order.
Following these steps on a regular basis, typically once a year, will help keep your tankless water heater running efficiently and extend its lifespan.
Gather necessary tools

Before you begin the tankless water flush process, it’s important to gather all the necessary tools and materials. Having everything ready will make the process much smoother and more efficient.
Here is a list of the essential tools and materials you will need:
- Bucket or drain pan: This will be used to collect the water and debris that comes out during the flush.
- Garden hose: You’ll need a garden hose long enough to reach from your tankless water heater to a drain or outdoor area.
- Threaded hose adapter: This adapter will allow you to connect the garden hose to the water heater.
- Vinegar or descaling solution: A solution of vinegar and water or a descaling solution will be used to clean the interior of the water heater.
- Bucket or container for descaling solution: You’ll need a container to mix the descaling solution and pour it into the water heater.
- Soft brush or cloth: A soft brush or cloth will be used to scrub any stubborn mineral deposits or buildup.
- Screwdriver or wrench: Depending on your water heater model, you may need a screwdriver or wrench to remove any access panels or covers.
Having these tools and materials ready will ensure that you can complete the tankless water flush process without any interruptions. Once you have everything prepared, you can move on to the next steps of cleaning and maintaining your unit.
Turn off power and water supply

Before starting the process of flushing and cleaning your tankless water heater, it is important to turn off both the power and water supply to the unit. This ensures your safety and prevents any damage to the heater during the maintenance process.
To turn off the power supply, locate the circuit breaker or fuse box that controls the heater. Flip the switch or remove the fuse that corresponds to the heater to cut off the electricity.
Next, locate the shut-off valve on the water supply line that connects to the tankless water heater. Turn the valve clockwise to shut off the water flow to the unit. This will prevent any water from entering the heater during the cleaning process.
By turning off both the power and water supply, you can safely proceed with flushing and cleaning your tankless water heater without any risk of electrical shock or water damage.
Flush the system

Regularly flushing your tankless water heater is essential to maintain its performance and extend its lifespan. Flushing helps remove mineral deposits, sediment, and other impurities that can build up inside the unit over time.
Here is a step-by-step guide on how to flush your tankless water heater:
- Turn off the power to the heater by unplugging it or switching off the circuit breaker.
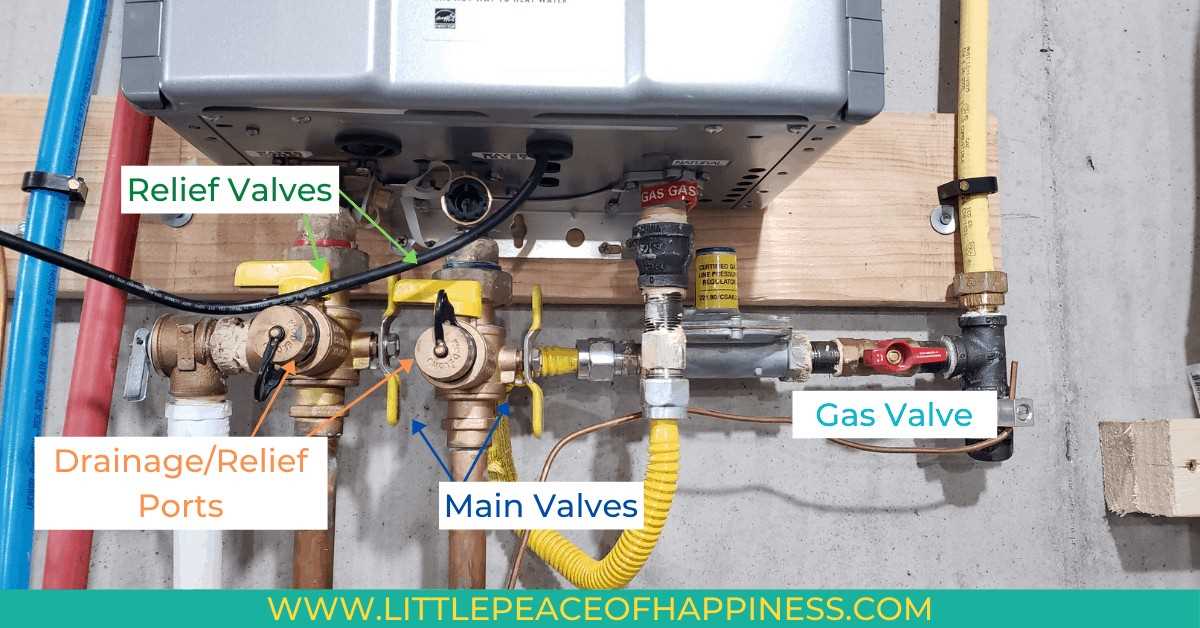
- Close the gas valve if your tankless water heater is powered by gas.
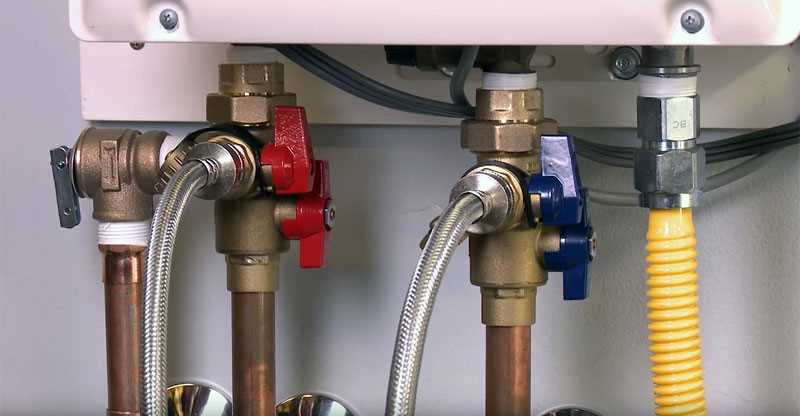
- Locate the cold water inlet and hot water outlet valves on the unit.
- Connect a garden hose to the cold water inlet valve and place the other end in a bucket or drain.
- Open the cold water inlet valve and allow the water to flow through the unit and out of the drain. This will help flush out any sediment or debris.
- Keep the water flowing for about 5-10 minutes or until the water runs clear.
- Close the cold water inlet valve and disconnect the garden hose.
- Open the hot water outlet valve to allow any remaining water to drain out.
- Close the hot water outlet valve once the water has stopped flowing.
- Remove the drain cap or plug from the unit and reinstall any components that were removed.
- Turn on the cold water supply to the unit and allow it to fill completely.
- Restore power to the tankless water heater by plugging it back in or switching on the circuit breaker.
It is recommended to flush your tankless water heater at least once a year or as recommended by the manufacturer. Regular flushing will help maintain the efficiency of your unit and prevent any potential issues caused by sediment or mineral buildup.
Tips for effective cleaning

Regular cleaning and maintenance of your tankless water heater is essential for its optimal performance and longevity. Here are some tips to ensure effective cleaning:
- Turn off the power: Before starting the cleaning process, make sure to turn off the power supply to the water heater. This will ensure your safety and prevent any accidents.
- Drain the water: Begin by shutting off the water supply and draining the water from the heater. This will allow easy access to the internal components and prevent any water spillage during the cleaning process.
- Remove and clean the filter: Locate the filter in your tankless water heater and remove it. Rinse the filter with water to remove any debris or sediment that may have accumulated over time. Cleaning the filter regularly will help maintain the efficiency of your water heater.
- Flush the system: To remove any mineral buildup or scale inside the water heater, perform a thorough flush of the system. Connect a hose to the flush port of the heater and run water through it for several minutes. This will help remove any accumulated deposits and improve the overall performance of the unit.
- Inspect and clean the burner: Carefully inspect the burner for any signs of dirt or debris. Use a soft brush or cloth to gently clean the burner and remove any buildup. This will ensure the proper functioning of the burner and prevent any potential issues.
- Check the vents: Examine the vents of your tankless water heater for any obstructions or blockages. Clear any debris or dirt that may be obstructing the airflow. This will help maintain the efficiency of the unit and prevent overheating.
- Perform regular maintenance: In addition to regular cleaning, it is important to schedule professional maintenance for your tankless water heater. A qualified technician can inspect the unit, perform any necessary repairs, and ensure its optimal performance.
By following these tips for effective cleaning, you can keep your tankless water heater in excellent condition and enjoy a continuous supply of hot water.
Use a descaling solution

Over time, mineral deposits can build up inside your tankless water heater, reducing its efficiency and potentially causing damage. To prevent this, it’s important to regularly clean and descale your unit.
Using a descaling solution is an effective way to remove mineral deposits and restore your tankless water heater’s performance. Here’s how to do it:
- Turn off the power supply and gas supply to the water heater.
- Close the cold water supply valve to the water heater.
- Attach a hose to the drain valve of the water heater and place the other end in a suitable drain or bucket.
- Open the drain valve to allow the water to flow out of the water heater.
- Mix a descaling solution according to the manufacturer’s instructions. Typically, this will involve diluting the solution with water.
- Close the drain valve and pour the descaling solution into the cold water inlet of the water heater.
- Open the hot water taps in your home to allow the descaling solution to flow through the pipes and into the water heater.
- Let the descaling solution sit in the water heater for the recommended amount of time, usually around one hour.
- After the recommended amount of time has passed, close the hot water taps and open the cold water supply valve to flush out the descaling solution.
- Open the drain valve again to drain the remaining solution from the water heater.
- Once all the solution has been drained, close the drain valve and remove the hose.
- Open the cold water supply valve and allow the tankless water heater to fill up with fresh water.
- Turn on the power supply and gas supply to the water heater.
- Check for any leaks and ensure that the water heater is functioning properly.
By regularly using a descaling solution, you can keep your tankless water heater running efficiently and prolong its lifespan.
Video:Tankless Water Heater Flush How to Clean and Maintain Your Unit
Hello, I am Beverly J. Sanders, the voice behind the diverse articles you come across on styves.co.za. My passion lies in exploring the nuances of home improvement and sharing tips that can help you transform your living space into a haven of comfort and style. From the latest trends in home decor to practical cleaning advice, I cover a broad spectrum of topics to cater to a wide variety of interests.
In my recent works, I have delved into the advantages of incorporating a horizontal Murphy bed into your home to save space without compromising on design and functionality. I also explored the benefits of having a free-standing electric fireplace that not only adds warmth to your home but also brings a sleek and modern design to any living space. My articles are a rich resource, offering insights into different products and home improvement strategies that can enhance the quality of your life.
I believe in the power of details; a belief that reflects in my comprehensive guides where I discuss even the overlooked aspects of home decor, such as the impact of baseboard trim in enhancing the overall look and feel of your home. I am constantly on the lookout for innovative solutions and products that can add value to your home and life.
Join me in my exploration as I continue to bring you the latest trends, tips, and insights in the home improvement world. Let’s create a home that is not just a place to live, but a reflection of style and personality.