Can You Paint Vinyl Windows Tips and Tricks for a Fresh Look

If you have vinyl windows in your home, you may be wondering if it’s possible to give them a fresh new look with a coat of paint. The good news is that, yes, you can paint vinyl windows! Whether you want to change the color to match your home’s exterior or simply refresh the look, painting vinyl windows can be a cost-effective and easy way to update your home’s appearance.
Before you start, it’s important to keep in mind a few tips and tricks to ensure a successful paint job. First, make sure to clean the windows thoroughly to remove any dirt or debris. This will help the paint adhere better and result in a smoother finish. You can use a mild soap and water solution or a vinyl cleaner specifically designed for this purpose.
Next, it’s important to choose the right type of paint for vinyl surfaces. Look for a high-quality exterior paint that is specifically formulated for use on vinyl. These paints are designed to withstand the elements and provide a long-lasting finish. Avoid using oil-based paints, as they may not adhere well to vinyl and can crack or peel over time.
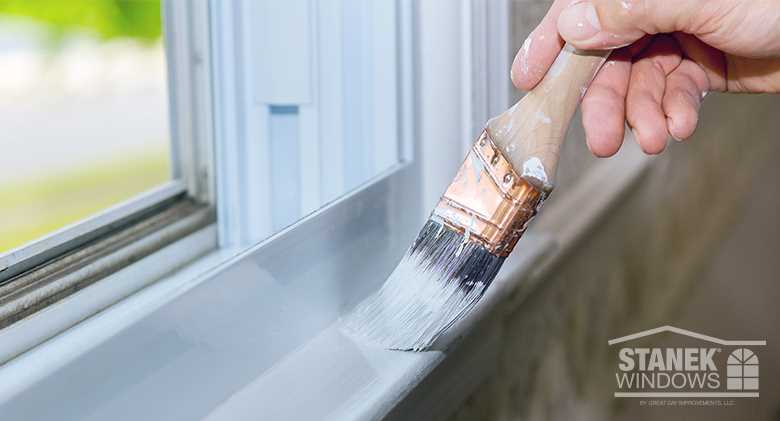
When it comes to applying the paint, it’s best to use a brush or roller for an even and professional-looking finish. Start with a thin coat and allow it to dry completely before applying additional coats. This will help prevent drips or uneven coverage. If you’re painting the windows a different color than the frames, use painter’s tape to protect the frames from any accidental paint splatters.
In conclusion, painting vinyl windows is a great way to give them a fresh new look. With the right preparation and the right type of paint, you can achieve a beautiful and long-lasting finish. So go ahead and transform your vinyl windows with a splash of color!
Preparing Your Vinyl Windows for Painting
Before you start painting your vinyl windows, it’s important to properly prepare them to ensure a smooth and long-lasting finish. Here are some tips to help you get started:
- Clean the windows: Begin by cleaning the vinyl windows thoroughly to remove any dirt, dust, or grime. Use a mild detergent mixed with water and a soft cloth or sponge to gently scrub the surface. Rinse with clean water and allow the windows to dry completely.
- Sand the surface: Next, lightly sand the vinyl windows using fine-grit sandpaper. This will help create a rougher surface, allowing the paint to adhere better. Be careful not to sand too aggressively, as this can damage the vinyl.
- Apply a primer: To improve adhesion and ensure a more even finish, it’s recommended to apply a primer specifically designed for use on vinyl surfaces. Use a paintbrush or a roller to apply the primer evenly across the windows. Allow the primer to dry completely before moving on to the next step.
- Choose the right paint: When it comes to painting vinyl windows, it’s important to select a paint that is specifically formulated for use on vinyl or plastic surfaces. These paints are designed to expand and contract with the vinyl, preventing cracking or peeling. Consult with a paint specialist at your local home improvement store to find the best paint for your windows.
- Paint the windows: Once the primer is dry, you can start painting your vinyl windows. Use a paintbrush or a roller to apply the paint in smooth, even strokes. Start from the top and work your way down, allowing each coat to dry before applying the next. Apply multiple thin coats rather than one thick coat for a more durable and professional-looking finish.
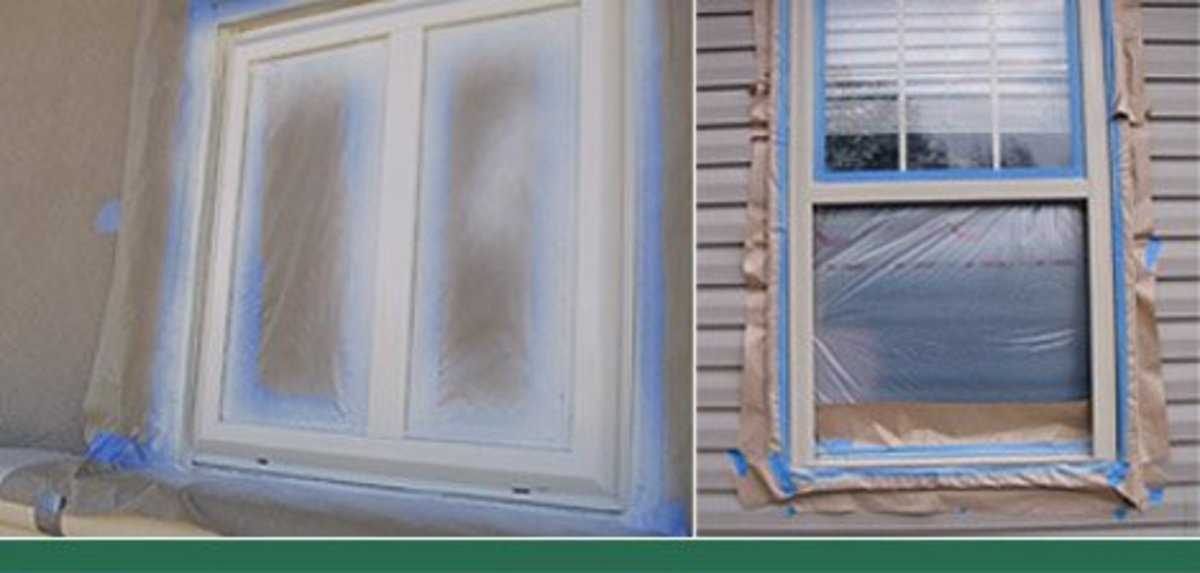
- Protect the surrounding areas: To avoid getting paint on other surfaces, it’s important to protect the surrounding areas. Cover the window frames, glass, and any nearby walls or furniture with painter’s tape and drop cloths.
- Allow the paint to cure: After you’ve finished painting, allow the windows to dry and cure completely before using or touching them. This can take several days, so be patient and avoid opening or closing the windows during this time.
By following these steps and taking the time to properly prepare your vinyl windows for painting, you can achieve a fresh and updated look that will last for years to come.
Cleaning the Surface

Before you can paint vinyl windows, it is important to clean the surface thoroughly. This will ensure that the paint adheres properly and provides a long-lasting finish. Here are some tips for cleaning the surface of your vinyl windows:
- Gather your supplies: You will need a bucket, warm water, mild detergent, a soft sponge or cloth, and a garden hose.
- Remove any dirt or debris: Use a soft sponge or cloth to wipe away any dirt or debris from the surface of the vinyl windows. Pay special attention to the corners and edges where dirt can accumulate.
- Mix the cleaning solution: Fill a bucket with warm water and add a small amount of mild detergent. Stir the solution to create a soapy mixture.
- Wash the windows: Dip the sponge or cloth into the soapy water and gently scrub the surface of the vinyl windows. Start at the top and work your way down, using circular motions to remove any grime or stains.
- Rinse with clean water: Once you have finished washing the windows, use a garden hose to rinse away the soapy residue. Make sure to remove all traces of detergent, as this can affect the adhesion of the paint.
- Dry the surface: Use a clean cloth or towel to dry the surface of the vinyl windows. This will ensure that the paint goes on smoothly and evenly.
By following these steps, you can ensure that the surface of your vinyl windows is clean and ready for painting. Taking the time to properly clean the windows will help the paint adhere better and provide a fresh, long-lasting look.
Sanding the Vinyl
If you are considering painting your vinyl windows, you may be wondering if sanding is necessary. While sanding is not always required, it can help to ensure a smooth and long-lasting finish. Here are a few things to consider when it comes to sanding your vinyl windows:
- Can you sand vinyl? Yes, you can sand vinyl windows, but it is important to proceed with caution. Vinyl is a relatively soft material, so it is important to use a light touch when sanding to avoid damaging the surface.
- Why sand vinyl? Sanding the vinyl windows can help to remove any existing paint or surface imperfections, creating a clean and smooth surface for the new paint to adhere to. It can also help to roughen up the surface slightly, allowing the paint to bond better.
- How to sand vinyl windows? Start by cleaning the windows with a mild detergent and water to remove any dirt or debris. Then, use a fine-grit sandpaper (around 220 grit) to lightly sand the surface of the vinyl. Be sure to sand in a circular motion and avoid applying too much pressure. After sanding, wipe away any dust with a clean, damp cloth.
- Can you skip sanding? While sanding is not always necessary, it is generally recommended to ensure the best possible results. Skipping the sanding step may result in a less durable and less smooth finish.
Remember, proper preparation is key when it comes to painting vinyl windows. Sanding the surface can help to create a clean and smooth canvas for your paint job. By taking the time to sand the vinyl, you can ensure a fresh and long-lasting finish that will enhance the look of your windows.
Applying Primer
When it comes to painting vinyl windows, applying primer is an important step that you shouldn’t skip. Primer helps create a smooth and even surface for the paint to adhere to, ensuring a long-lasting and professional-looking finish. Here are some tips and tricks for applying primer to your vinyl windows:
- Choose the right primer: Look for a primer specifically designed for vinyl surfaces. These primers are formulated to adhere well to vinyl and provide excellent coverage. Make sure to read the label to ensure compatibility with vinyl materials.
- Clean the windows: Before applying primer, thoroughly clean the vinyl windows to remove any dirt, dust, or debris. Use a mild detergent and water solution, and gently scrub the surface with a soft cloth or sponge. Rinse well and allow the windows to dry completely before moving on to the next step.
- Prepare the area: Protect the surrounding areas by covering them with drop cloths or plastic sheets. This will prevent any accidental spills or splatters from damaging other surfaces.
- Apply the primer: Use a brush or roller to apply the primer to the vinyl windows. Start with the edges and corners, and then work your way to the larger flat surfaces. Apply the primer in thin, even coats, making sure to cover the entire surface. Follow the manufacturer’s instructions for drying time between coats.
- Sand between coats: If necessary, lightly sand the primer between coats to ensure a smooth and even finish. Use fine-grit sandpaper and gently sand the surface in a circular motion. Wipe away any dust with a clean cloth before applying the next coat of primer.
- Allow the primer to cure: After applying the final coat of primer, allow it to cure completely before proceeding with the paint. This can take anywhere from a few hours to overnight, depending on the product and environmental conditions.
By following these tips and tricks, you can ensure that the primer is applied correctly to your vinyl windows, providing a solid foundation for the paint and helping it adhere properly. This will result in a fresh and professional look that can transform the appearance of your windows.
Painting Your Vinyl Windows

If you have vinyl windows and want to change their color or give them a fresh look, you may be wondering if you can paint them. The good news is that yes, you can paint vinyl windows! However, there are a few important things to keep in mind to ensure a successful and long-lasting paint job.
1. Clean the windows: Before painting, it’s crucial to clean the vinyl windows thoroughly. Use a mild detergent mixed with water to remove any dirt, dust, or grime. Rinse well and allow the windows to dry completely before proceeding.
2. Choose the right paint: Not all paints are suitable for vinyl surfaces. Look for a high-quality exterior paint specifically formulated for use on vinyl. These paints are designed to adhere well to the vinyl surface and provide excellent durability and weather resistance.
3. Prime the windows: Applying a primer before painting is essential to ensure proper adhesion and long-lasting results. Use a primer that is compatible with both the vinyl material and the paint you’ve chosen. Follow the manufacturer’s instructions for application and drying times.
4. Select the color: When choosing a color for your vinyl windows, keep in mind that darker shades may absorb more heat from the sun, which can cause the vinyl to expand and warp. It’s generally recommended to stick with lighter or neutral colors to minimize this risk.
5. Apply the paint: Use a brush or roller to apply the paint evenly on the vinyl windows. Start with thin coats and allow each coat to dry completely before applying the next one. This will help prevent drips and ensure a smooth finish. Follow the paint manufacturer’s instructions regarding drying times and the number of coats needed.
6. Maintain the painted windows: Once you’ve painted your vinyl windows, it’s important to maintain them properly to ensure their longevity. Regularly clean the windows with a mild detergent and avoid using abrasive cleaners or tools that can scratch the paint. Inspect the windows periodically for any signs of peeling or damage and touch up the paint as needed.
By following these tips and tricks, you can successfully paint your vinyl windows and give them a fresh, new look. Remember to take your time, choose the right materials, and properly maintain the painted windows to enjoy the results for years to come.
Video:Can You Paint Vinyl Windows Tips and Tricks for a Fresh Look
Can You Paint Vinyl Siding? Tips and Tricks on Painting Vinyl Like a Pro!
Hello, I am Beverly J. Sanders, the voice behind the diverse articles you come across on styves.co.za. My passion lies in exploring the nuances of home improvement and sharing tips that can help you transform your living space into a haven of comfort and style. From the latest trends in home decor to practical cleaning advice, I cover a broad spectrum of topics to cater to a wide variety of interests.
In my recent works, I have delved into the advantages of incorporating a horizontal Murphy bed into your home to save space without compromising on design and functionality. I also explored the benefits of having a free-standing electric fireplace that not only adds warmth to your home but also brings a sleek and modern design to any living space. My articles are a rich resource, offering insights into different products and home improvement strategies that can enhance the quality of your life.
I believe in the power of details; a belief that reflects in my comprehensive guides where I discuss even the overlooked aspects of home decor, such as the impact of baseboard trim in enhancing the overall look and feel of your home. I am constantly on the lookout for innovative solutions and products that can add value to your home and life.
Join me in my exploration as I continue to bring you the latest trends, tips, and insights in the home improvement world. Let’s create a home that is not just a place to live, but a reflection of style and personality.