Contents
How to Draw a Gnome Step-by-Step Guide for Beginners

If you’ve ever wondered how to draw a gnome, you’re in luck! Gnomes are whimsical creatures that have captured the imaginations of people for centuries. Whether you want to create your own gnome character or simply want to improve your drawing skills, this step-by-step guide will help you bring these magical creatures to life on paper.
Before you begin, gather your drawing materials. You’ll need a pencil, eraser, and paper. It’s also helpful to have some colored pencils or markers on hand if you want to add color to your gnome later on. Once you’re ready, let’s get started!
Begin by drawing the basic shape of the gnome’s head and body. Gnomes are typically short and stout, so draw a circle for the head and a larger oval shape for the body. Don’t worry about getting the proportions perfect at this stage, as you can always make adjustments later.
Next, add in the gnome’s facial features. Draw two large circles for the eyes, with smaller circles inside for the pupils. Give your gnome a big smile by drawing a curved line for the mouth. To add some character, you can also draw bushy eyebrows and a pointy nose. Once you’re happy with the face, move on to the next step.
Sketching the Basic Shapes

Before you start drawing a gnome, it’s important to break down the figure into basic shapes. This will help you establish the proportions and overall structure of the gnome.
To begin, you can start by sketching a circle for the head of the gnome. This circle will serve as a guide for the placement of facial features later on.
Next, draw a rectangle shape below the head to represent the body of the gnome. This rectangle should be wider at the bottom to create a tapered effect.
For the arms, you can draw two curved lines extending from the sides of the body. These lines will serve as a guide for the position of the arms, which will be added in more detail later.
After sketching the basic body shape, you can add a smaller circle on top of the head to represent the gnome’s hat. The hat can be drawn at an angle to add character to the gnome.
Finally, add two small circles at the bottom of the body to represent the feet of the gnome. These circles should be slightly larger at the front to create the illusion of perspective.
Once you have sketched the basic shapes, you can start adding more details and refining the drawing of the gnome. This will involve adding facial features, clothing, and other accessories to bring the gnome to life.
Remember, sketching the basic shapes is just the first step in drawing a gnome. With practice and patience, you can create a unique and charming gnome drawing!
Drawing the Head
When it comes to drawing a gnome, the head is an essential part of capturing its unique character. Here are the steps to draw the head of a gnome:
- Start with a circle: Begin by drawing a large circle in the center of your paper. This will serve as the basic shape of the gnome’s head.
- Add facial features: Within the circle, draw two small circles for the eyes, a curved line for the nose, and a smiling mouth. Remember to keep the features simple and cartoony.
- Define the beard: Gnomes are known for their long, bushy beards. Draw a wavy line below the gnome’s mouth to represent the beard. Add some lines to create texture and volume.
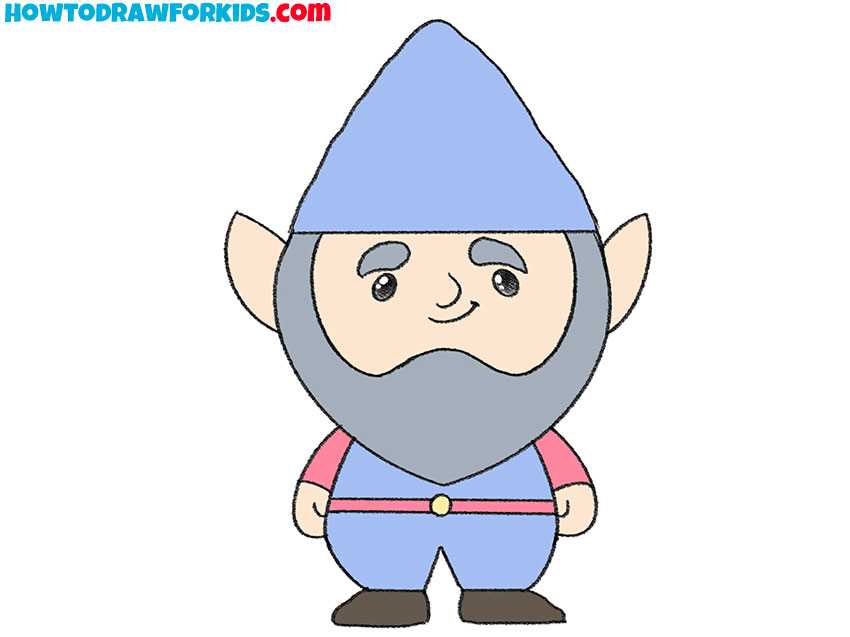
- Draw the hat: Gnomes often wear pointy hats. Add a triangle shape above the head to represent the hat. You can also add some lines or patterns for extra detail.
- Finish with the ears: Gnomes typically have large, pointy ears. Draw two curved lines on either side of the head, starting from the top of the hat and extending down towards the bottom of the head.
Remember, drawing takes practice, so don’t be discouraged if your first attempt doesn’t turn out exactly as you’d like. Keep practicing and experimenting with different styles and techniques, and soon you’ll be able to draw gnomes with ease!
Creating the Body
To draw a gnome, you will start by creating the body. The body of a gnome is usually round and plump, giving it a cute and whimsical appearance.
To create the body, follow these steps:
- Start by drawing a large circle in the middle of your paper. This will be the gnome’s body.
- Next, add two smaller circles on top of the body circle. These will be the gnome’s shoulders.
- Connect the body circle and the shoulder circles with curved lines to create the gnome’s neck.
- Draw two short lines protruding from the bottom of the body circle. These will be the gnome’s legs.
- Add two small ovals at the end of each leg to create the gnome’s feet.
Once you have completed these steps, you will have the basic shape of the gnome’s body. Remember to use light pencil lines at this stage, as you will be refining and adding details in the next steps.
Adding the Arms and Legs

To draw the gnome’s arms, start by drawing two slightly curved lines extending out from the sides of the gnome’s body. These lines will be the gnome’s upper arms. Then, draw two shorter curved lines extending out from the ends of the upper arms to create the gnome’s lower arms. Add small circles at the ends of the lower arms to represent the gnome’s hands.
Next, draw the gnome’s legs. Start by drawing two slightly curved lines extending down from the bottom of the gnome’s body. These lines will be the gnome’s upper legs. Then, draw two shorter curved lines extending down from the ends of the upper legs to create the gnome’s lower legs. Add small circles at the ends of the lower legs to represent the gnome’s feet.
Remember to use light, sketchy lines when drawing the arms and legs, as these lines will be erased later on. Once you are satisfied with the placement and shape of the arms and legs, you can go over them with darker, more defined lines.
Refining the Features

Once you have completed the basic outline of your gnome, it’s time to refine the features and add more details to bring your drawing to life.
Here are some steps to help you refine the features of your gnome:
- Face: Start by adding more details to the gnome’s face. Draw the eyes, nose, and mouth, paying attention to the shape and proportions. You can make the eyes round or oval-shaped, and the nose can be small and pointy or slightly larger and round. Experiment with different expressions to give your gnome personality.
- Beard: Gnomes are known for their long, bushy beards. Use short, curved lines to create the texture of the beard. Add some stray hairs to make it look more realistic.
- Hat: Gnomes typically wear pointy hats. Draw the outline of the hat, making it slightly taller than the gnome’s head. Add some lines to show the folds and creases in the fabric.
- Clothes: Gnomes often wear simple, rustic clothing. Draw the outline of the gnome’s clothes, adding some wrinkles and folds to make them look more realistic. You can also add some patterns or textures to the fabric if you’d like.
- Accessories: Gnomes are often depicted with accessories like belts, boots, and tools. Add these details to your drawing to give your gnome more character. Pay attention to the proportions and placement of these accessories.
Remember, drawing a gnome is all about having fun and being creative. Don’t be afraid to experiment with different features and styles to make your gnome unique.
Adding Facial Details
Once you have drawn the basic outline of your gnome, it’s time to add some facial details to bring your gnome to life. Here are the steps to follow:
- Eyes: Start by drawing two oval shapes for the eyes. Place them slightly above the middle of the gnome’s face. You can make the eyes large or small, depending on the style you prefer. Add smaller ovals inside the eyes to represent the pupils.
- Eyebrows: Draw two curved lines above each eye to indicate the eyebrows. Gnomes often have bushy eyebrows, so make them thick and textured.
- Nose: Draw a small oval shape below the eyes to represent the gnome’s nose. You can give it a slight curve to make it look more unique.
- Mouth: Add a curved line below the nose to create the mouth. You can make it a smile, a frown, or any expression you like. Gnomes are known for their mischievous smiles, so consider adding a little upward curve to the corners of the mouth.
- Beard: Gnomes typically have long, bushy beards. Draw a series of curved lines extending from the side of the gnome’s face to represent the beard. Make the lines wavy and uneven to add texture and volume.
- Hat: Finish off the facial details by drawing the gnome’s hat. Gnomes are often depicted wearing pointed hats. Start by drawing a triangle shape above the head, then connect it to the head with curved lines. Add some details like stripes or dots to make the hat more interesting.
Remember, these are just general guidelines. Feel free to add your own creative touches and make your gnome unique. Have fun with it!
Defining the Body Structure
When learning how to draw a gnome, it’s important to start by defining the body structure. By understanding the basic proportions and shapes, you can create a solid foundation for your gnome drawing.
Here are the key steps to follow:
- Start with a basic shape: Begin by drawing a large oval shape for the gnome’s body. This will serve as the main framework for the rest of the drawing.
- Add the head: Above the oval shape, draw a smaller oval for the gnome’s head. Make sure it is proportionate to the body.
- Define the arms and legs: Extend two lines from the sides of the body to create the gnome’s arms. For the legs, draw two lines extending from the bottom of the body.
- Create the hands and feet: At the end of each arm, draw small circles to represent the gnome’s hands. Similarly, draw small ovals at the end of each leg for the feet.
- Add details: To make the gnome’s body more interesting, you can add details such as a belt around the waist or buttons on the shirt. Be creative and add any additional features you like.
Remember, these are just basic guidelines to get you started. Once you feel comfortable with the body structure, you can begin adding more intricate details and personal touches to make your gnome drawing unique.
Next, we will move on to defining the gnome’s facial features and clothing. Stay tuned!
Adding Clothing and Accessories
Once you have drawn the basic shape of your gnome, it’s time to add some clothing and accessories to give it personality and style. Here are some steps to help you add the finishing touches to your gnome drawing:
- Determine the style: Decide what kind of clothing you want your gnome to wear. Traditional gnomes often wear pointy hats, long coats, and boots, while modern gnomes can be dressed in more contemporary outfits.
- Sketch the clothing: Use light pencil strokes to outline the shape of the clothing on your gnome. Pay attention to the folds and creases to make it look more realistic.
- Add details: Once you have the basic shape, you can start adding details like buttons, belts, pockets, or patterns on the clothing. Use thin, precise lines to make these details stand out.
- Choose accessories: Gnomes often carry props or accessories that reflect their hobbies or interests. You can draw your gnome holding a fishing rod, a gardening tool, or even a musical instrument.
- Color: If you want to add color to your gnome drawing, use colored pencils or markers to fill in the clothing and accessories. Be creative and choose colors that complement each other.
Remember, drawing clothing and accessories is a great way to personalize your gnome and make it unique. Have fun with it and don’t be afraid to experiment!
Drawing the Hat

Now that you have drawn the basic shape of the gnome’s head and body, it’s time to add the hat. The hat is an important part of the gnome’s appearance and can be drawn in various styles and shapes.
To start, draw a curved line above the gnome’s head to represent the brim of the hat. Make sure the line is slightly curved upwards towards the center of the head.
Next, draw two lines that start from the top of the curved line and meet at a point at the top of the hat. These lines will form the cone shape of the hat. Make the lines slightly curved to give the hat a more organic and natural look.
Once you have drawn the basic shape of the hat, you can add some details to make it look more interesting. You can draw a band around the base of the hat by adding a curved line. This will give the hat a more finished and polished look.
After you have added the band, you can also draw some small lines or dots on the hat to represent texture or patterns. These details will add depth and character to the hat.
Remember, there are no strict rules when it comes to drawing a gnome’s hat. You can get creative and experiment with different shapes, sizes, and details. Let your imagination guide you and have fun with it!
Designing the Clothes
When it comes to drawing a gnome, one of the most fun parts is designing their clothes! Gnomes are known for their unique and whimsical fashion sense, so let your imagination run wild.
Here are some steps to follow when designing the clothes for your gnome:
- Start with the basics: Begin by drawing the outline of the gnome’s body. This will serve as the foundation for the clothes. Make sure to include the head, arms, and legs.
- Choose a style: Decide what style of clothes you want your gnome to wear. Will they be dressed in traditional gnome attire, like a pointy hat and tunic? Or will they have a more modern and trendy look?
- Add details: Once you’ve decided on the style, start adding details to the clothes. Use lines and shapes to create patterns, buttons, pockets, or any other embellishments you like. Remember, gnomes love bright colors and patterns, so don’t be afraid to get creative!
- Accessorize: Gnomes often wear accessories to complete their outfits. Draw a belt, scarf, or even a pair of funky socks to add personality to your gnome’s look.
- Final touches: Once you’re happy with the design, go over the lines with a darker pencil or pen to make them stand out. You can also add shading or color to bring the clothes to life.
Remember, the key to designing the clothes for your gnome is to have fun and let your imagination guide you. There are no right or wrong choices, so don’t be afraid to experiment and try new things. Happy drawing!
Adding Accessories

Once you have drawn the basic shape of your gnome, it’s time to add some accessories to give it more character and personality. Accessories can include things like hats, scarves, belts, and even small props like a mushroom or a lantern.
Here is a step-by-step guide on how to add accessories to your gnome drawing:
- Decide on the accessories: Think about what kind of accessories you want your gnome to have. This can be based on the theme or story you have in mind for your drawing.
- Start with the hat: Gnomes are often depicted wearing pointy hats. Draw a cone shape on top of the gnome’s head to represent the hat. You can make it as tall or short as you like.
- Add details to the hat: Use curved lines to add texture and folds to the hat. You can also add a band or a buckle to the hat to make it more interesting.
- Draw the face: Add facial features to your gnome, such as eyes, a nose, and a mouth. You can also give it rosy cheeks for a more cheerful look.
- Draw the body: Add more details to the body, such as a shirt, pants, or a dress. You can use curved lines to create the appearance of folds in the clothing.
- Accessorize: Now it’s time to add the finishing touches. You can draw a belt around the gnome’s waist, a scarf around its neck, or even a small prop like a mushroom or a lantern.
- Finalize the details: Go over your drawing and make any necessary adjustments or additions. Add shading or color if desired to make your gnome drawing pop.
Remember, the key to drawing accessories is to have fun and be creative. Don’t be afraid to experiment with different shapes, sizes, and colors to make your gnome truly unique.
Video:How to Draw a Gnome Step-by-Step Guide for Beginners
How To Draw A Christmas Gnome Step By Step For Beginners | Easy Christmas Gnome Drawing Tutorial
How to Draw a Gnome: Step by Step Art Class for Kids!
Cute Gnome Drawing – Draw for Kids | Sunday Art Class (Christmas Series)
Hello, I am Beverly J. Sanders, the voice behind the diverse articles you come across on styves.co.za. My passion lies in exploring the nuances of home improvement and sharing tips that can help you transform your living space into a haven of comfort and style. From the latest trends in home decor to practical cleaning advice, I cover a broad spectrum of topics to cater to a wide variety of interests.
In my recent works, I have delved into the advantages of incorporating a horizontal Murphy bed into your home to save space without compromising on design and functionality. I also explored the benefits of having a free-standing electric fireplace that not only adds warmth to your home but also brings a sleek and modern design to any living space. My articles are a rich resource, offering insights into different products and home improvement strategies that can enhance the quality of your life.
I believe in the power of details; a belief that reflects in my comprehensive guides where I discuss even the overlooked aspects of home decor, such as the impact of baseboard trim in enhancing the overall look and feel of your home. I am constantly on the lookout for innovative solutions and products that can add value to your home and life.
Join me in my exploration as I continue to bring you the latest trends, tips, and insights in the home improvement world. Let’s create a home that is not just a place to live, but a reflection of style and personality.