Contents
- 1 How to Remove and Prevent Grout Stains Ultimate Guide
- 1.1 What are grout stains?
- 1.2 The importance of removing grout stains
- 1.3 Common causes of grout stains
- 1.4 Methods for removing grout stains
- 1.5 Using baking soda and vinegar
- 1.6 Using hydrogen peroxide
- 1.7 Using commercial grout cleaners
- 1.8 Tips for preventing grout stains
- 1.9 Sealing the grout
- 1.10 Regular cleaning and maintenance
- 1.11 Video:How to Remove and Prevent Grout Stains Ultimate Guide
How to Remove and Prevent Grout Stains Ultimate Guide

Stains on tile grout can be a real headache, especially in high-traffic areas like the kitchen and bathroom. Over time, grout can become discolored and dirty, making your beautiful floors or walls look less than appealing. But fear not! With the right tools and techniques, you can easily remove and prevent grout stains, restoring the original beauty of your tiles.
One of the first steps in tackling grout stains is to choose the right grout sealer. A high-quality sealer will help protect your grout from stains and make it easier to clean in the future. Look for a sealer that is specifically designed for grout and follow the manufacturer’s instructions for application.
If you already have stains on your grout, don’t despair. There are several effective grout stain removers on the market that can help. These removers are typically applied directly to the stained areas and left to sit for a period of time. Afterward, the stains can be scrubbed away with a brush or sponge. Be sure to read the instructions on the remover carefully and follow them closely to achieve the best results.
Prevention is key when it comes to grout stains. Regular cleaning and maintenance can go a long way in keeping your grout looking fresh and stain-free. Avoid using harsh cleaners or abrasive tools that can damage the grout. Instead, opt for mild cleaners and soft brushes or sponges. Additionally, wiping up spills and stains as soon as they occur can help prevent them from seeping into the grout and causing discoloration.
By following these tips and incorporating regular cleaning and maintenance into your routine, you can keep your grout looking pristine and prevent future stains. Say goodbye to unsightly grout stains and hello to beautiful, clean tiles!
What are grout stains?
Grout stains are discolorations or marks that appear on the grout lines between tiles on a floor or wall. Grout is a cement-based material that is used to fill the gaps between tiles and provide stability and support. Over time, grout can become stained or discolored due to various factors such as dirt, spills, mold, mildew, or improper cleaning methods. These stains can make the grout lines look dirty, dull, or unsightly.
Removing grout stains can be a challenging task, especially if they have been present for a long time or if the grout is porous. However, with the right tools and techniques, it is possible to effectively remove grout stains and restore the appearance of your tiles and grout lines.
There are several methods and products available for grout stain removal, including grout stain removers, homemade cleaning solutions, and professional cleaning services. The choice of method will depend on the severity of the stains, the type of tile and grout, and personal preference.
In addition to removing existing grout stains, it is important to take preventive measures to avoid future staining. Applying a grout sealer can help protect the grout lines from absorbing dirt, spills, and other substances that can cause stains. Regular cleaning and maintenance, using appropriate cleaning products and techniques, is also essential for keeping grout lines clean and stain-free.
Whether you are dealing with grout stains in your kitchen, bathroom, or any other tiled area, understanding what causes these stains and how to remove and prevent them can help you maintain the beauty and longevity of your tiles and grout.
The importance of removing grout stains

Grout stains can be a common issue in many households, especially in areas with tiled surfaces such as kitchens and bathrooms. These stains not only affect the appearance of your tiles but can also be unhygienic and difficult to remove. Therefore, it is important to understand the significance of removing grout stains and take necessary steps to prevent them from occurring in the future.
1. Aesthetics
Grout stains can greatly diminish the overall look of your tiled floors or walls. Whether it’s a dark, discolored stain or a patchy appearance, stained grout can make your tiles appear dirty and unkempt. Regular cleaning and removal of grout stains will help maintain the beauty and cleanliness of your tiled surfaces.
2. Hygiene
Stained grout can harbor bacteria, mold, and mildew, especially in areas like the bathroom or kitchen where moisture is present. These microorganisms can pose a health risk to you and your family. By removing grout stains, you eliminate the breeding ground for these harmful substances and create a healthier living environment.
3. Longevity
Grout stains can also affect the longevity of your tiles. If left untreated, stains can penetrate the grout and cause it to deteriorate over time. This can lead to cracks and gaps in the grout, which can result in water seepage and damage to the underlying structure. Regular removal of grout stains will help maintain the integrity of your tiled surfaces and prolong their lifespan.
4. Ease of cleaning
Stained grout can be notoriously difficult to clean. Regular cleaning and removal of grout stains will make your cleaning routine easier and more effective. By keeping the grout clean, you prevent the stains from becoming deeply ingrained and reduce the effort required to keep your tiles looking their best.
5. Prevention
While removing grout stains is important, it is equally crucial to take preventive measures to avoid future staining. Applying a grout sealer can help protect the grout from absorbing stains and make it easier to clean. Regular maintenance, such as wiping up spills and avoiding abrasive cleaners, can also help prevent grout stains from occurring in the first place.
Overall, the importance of removing grout stains cannot be overstated. By maintaining clean and stain-free grout, you not only enhance the appearance of your tiles but also ensure the hygiene, longevity, and ease of cleaning of your tiled surfaces. Take the necessary steps to remove existing grout stains and prevent future staining for a beautiful and healthy home.
Common causes of grout stains
Grout stains can be a common problem in both kitchen and bathroom tiles. They can make your tile floors and walls look dirty and unattractive. Here are some common causes of grout stains:
- Spills and stains: Accidental spills of food, beverages, or other substances can easily stain grout. If not cleaned up immediately, these stains can penetrate the porous surface of the grout and become difficult to remove.
- Mold and mildew: The damp and humid environment of bathrooms and kitchens can promote the growth of mold and mildew. These fungi can not only discolor grout but also cause it to deteriorate over time.
- Inadequate sealing: Grout should be properly sealed to protect it from stains. If the grout was not sealed or if the sealer has worn off, it becomes more susceptible to staining.
- Hard water deposits: If you have hard water, mineral deposits can build up on your grout over time. These deposits can leave behind unsightly stains that are difficult to remove.
- Poor cleaning habits: Regular cleaning is important to prevent grout stains. If grout is not cleaned regularly or if harsh cleaning chemicals are used, it can lead to discoloration and staining.
- Old and worn-out grout: Over time, grout can become worn-out and discolored due to age and wear. This can make it more prone to staining.
To prevent grout stains, it is important to address these common causes. Regular cleaning and maintenance, proper sealing, and prompt cleaning of spills can help keep your grout looking clean and stain-free.
Methods for removing grout stains
Cleaning with household products
- Mix equal parts of baking soda and water to create a paste.
- Apply the paste to the stained grout using a toothbrush or sponge.
- Scrub the grout in a circular motion to loosen the stains.
- Rinse the area with water and repeat if necessary.
Using a commercial grout cleaner
- Purchase a grout cleaner specifically designed for removing stains.
- Follow the instructions on the cleaner’s packaging.
- Apply the cleaner to the stained grout and let it sit for the recommended amount of time.
- Scrub the grout with a brush to remove the stains.
- Rinse the area with water to remove any residue.
Using a grout stain remover
- Purchase a grout stain remover from a home improvement store.
- Apply the stain remover to the stained grout according to the product’s instructions.
- Allow the remover to sit on the grout for the recommended amount of time.
- Scrub the grout with a brush to remove the stains.
- Rinse the area with water to remove any residue.
Sealing the grout
| Step | Description |
|---|---|
| 1 | Clean the grout thoroughly to remove any stains or dirt. |
| 2 | Allow the grout to dry completely. |
| 3 | Apply a grout sealer to the clean and dry grout. |
| 4 | Use a brush or sponge to spread the sealer evenly over the grout. |
| 5 | Allow the sealer to dry according to the manufacturer’s instructions. |
| 6 | Apply a second coat of sealer if recommended. |
By following these methods, you can effectively remove grout stains in your bathroom, kitchen, or any other tiled area. Regular cleaning and sealing of the grout can also help prevent future stains and keep your floors looking clean and fresh.
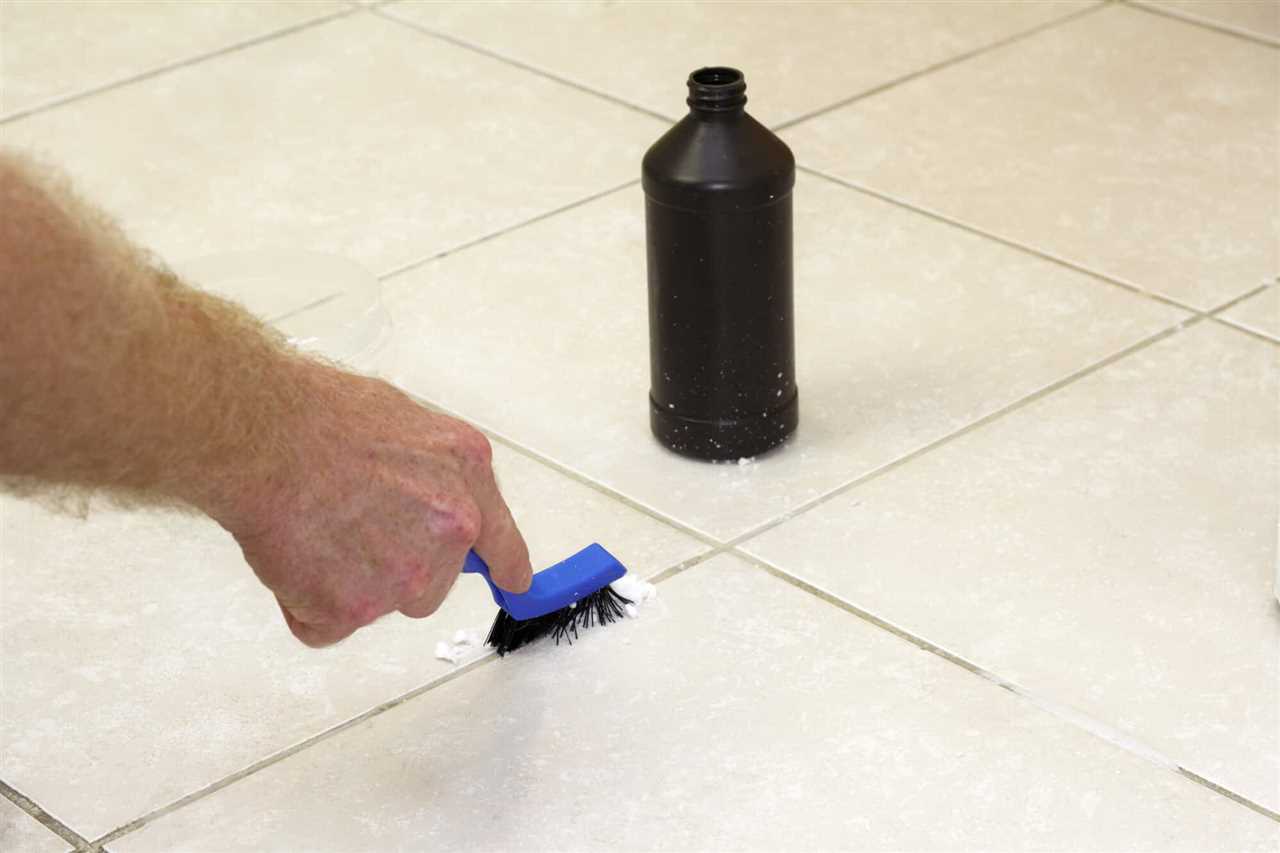
Using baking soda and vinegar
If you’re looking for a natural and effective grout stain remover, look no further than baking soda and vinegar. This powerful combination can help you tackle even the toughest grout stains in your bathroom or on your floor tiles.
Materials needed:
- Baking soda
- Vinegar
- Water
- Scrub brush or toothbrush
- Cloth or sponge
Instructions:
- Mix equal parts baking soda and water to create a paste. The consistency should be thick enough to stick to the grout lines.
- Apply the baking soda paste to the stained grout lines, making sure to cover the entire area.
- Let the paste sit on the grout for about 15 minutes to allow it to penetrate and break down the stains.
- In a spray bottle, mix equal parts vinegar and water. Spray the vinegar solution onto the baking soda paste, causing it to fizz and create a reaction.
- Using a scrub brush or toothbrush, scrub the grout lines in a circular motion to agitate the mixture and loosen the stains.
- Rinse the area with water to remove the baking soda and vinegar mixture.
- Wipe the grout lines with a cloth or sponge to remove any remaining residue.
- Repeat the process if necessary until the grout stains are completely removed.
Once the grout stains are removed, it is important to apply a grout sealer to protect the grout from future stains. This will help to keep your grout looking clean and fresh for longer periods of time.
Using baking soda and vinegar is a cost-effective and eco-friendly method for removing grout stains. Give it a try and see the difference it can make in restoring the beauty of your tiles!
Using hydrogen peroxide
If you are looking for an effective grout stain remover, hydrogen peroxide can be a great option. It is a powerful cleaning agent that can easily get rid of stubborn stains in your bathroom or kitchen.
To use hydrogen peroxide as a grout stain remover, follow these steps:
- Mix equal parts of hydrogen peroxide and water in a spray bottle.
- Spray the solution onto the stained grout and let it sit for about 15 minutes.
- Scrub the grout with a brush or a sponge to loosen the stain.
- Rinse the area with clean water to remove the hydrogen peroxide solution.
Hydrogen peroxide is particularly effective in removing tough stains on tile grout. However, it is important to note that hydrogen peroxide can potentially bleach colored grout, so it is recommended to test it on a small, inconspicuous area first.
After using hydrogen peroxide to remove grout stains, it is advisable to apply a grout sealer to prevent future staining. A grout sealer acts as a protective barrier, making it easier to clean and maintain the grout.
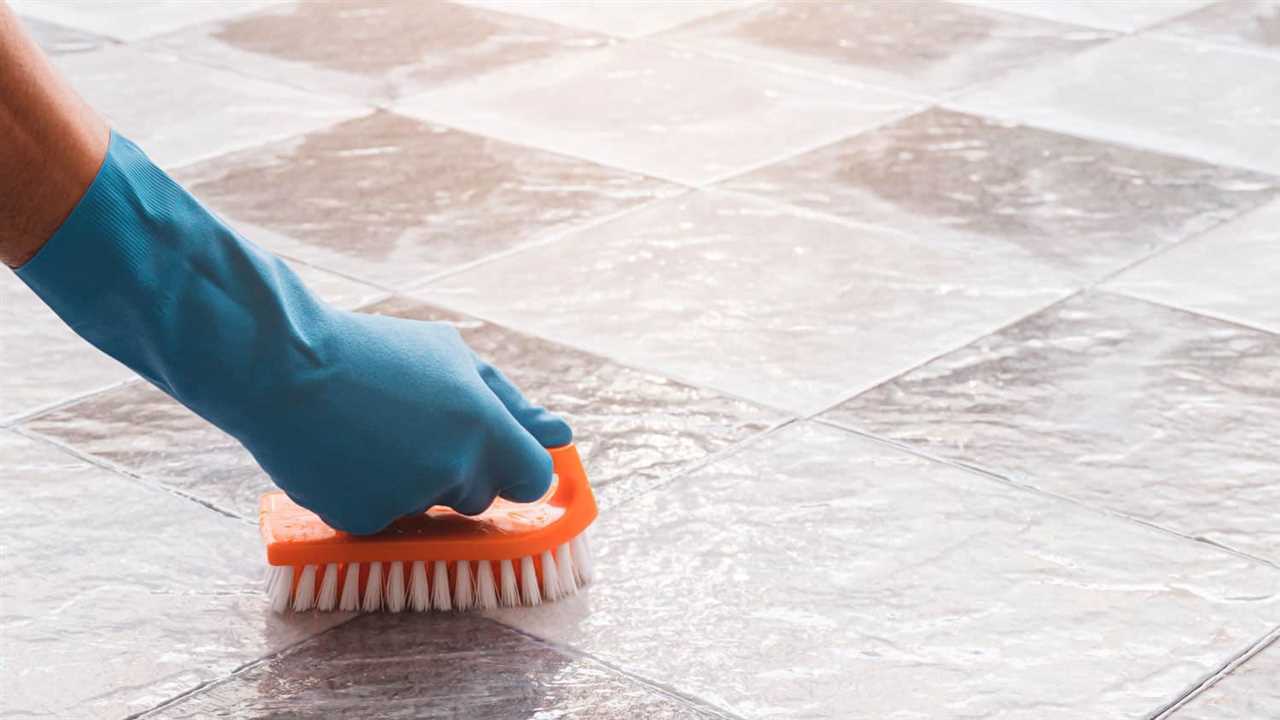
Using commercial grout cleaners
When it comes to cleaning grout in your kitchen or bathroom, commercial grout cleaners can be a great option. These cleaners are specially formulated to remove tough stains and dirt from grout lines, leaving them looking clean and fresh.
Here are some steps to follow when using commercial grout cleaners:
- Prepare the area: Before applying the cleaner, make sure to remove any loose dirt or debris from the grout lines. You can use a soft brush or a vacuum cleaner to do this.
- Choose the right cleaner: There are different types of commercial grout cleaners available in the market. Some are designed for specific types of grout, such as ceramic or porcelain tile grout. Make sure to read the label and choose a cleaner that is suitable for your grout type.
- Apply the cleaner: Follow the instructions on the cleaner’s packaging to apply it to the grout lines. Typically, you will need to spray or pour the cleaner onto the grout and let it sit for a few minutes to penetrate the stains.
- Scrub the grout: After letting the cleaner sit for the recommended time, use a grout brush or a toothbrush to scrub the grout lines. Make sure to apply some pressure to remove stubborn stains. You can also use a scrub pad or a sponge for larger areas.
- Rinse the grout: Once you have scrubbed the grout lines, rinse them thoroughly with clean water. This will remove any remaining cleaner and dirt from the grout.
- Seal the grout: After cleaning the grout, it is important to apply a grout sealer to protect it from future stains. This will create a protective barrier on the grout lines, making them easier to clean in the future.
Remember to always follow the instructions on the cleaner’s packaging and wear gloves and eye protection when using commercial grout cleaners. These cleaners can be effective in removing tough stains and keeping your tile grout looking clean and fresh.
Tips for preventing grout stains
- Seal the grout: Apply a grout sealer to your bathroom or kitchen tile to create a protective barrier that prevents stains from penetrating the grout. Make sure to reapply the sealer every few years to maintain its effectiveness.
- Clean spills immediately: Accidents happen, but it’s important to clean up any spills as soon as possible to prevent them from seeping into the grout and causing stains. Use a mild cleaning solution and a soft cloth to wipe away the spill.
- Use a grout cleaner: Regularly clean your grout using a grout cleaner specifically designed for removing stains. Follow the instructions on the cleaner and use a soft brush or sponge to scrub away any dirt or grime.
- Avoid abrasive cleaners: Harsh chemical cleaners or abrasive scrub brushes can damage the grout and make it more prone to staining. Stick to gentle cleaners and tools to protect the integrity of the grout.
- Keep the area well-ventilated: Moisture can contribute to the growth of mold and mildew, which can cause grout stains. Make sure your bathroom or kitchen is well-ventilated to prevent excess moisture from accumulating.
- Use a grout colorant: If your grout is already stained and you can’t remove the discoloration, consider using a grout colorant to change the color of the grout and make the stains less noticeable. Make sure to choose a color that matches your existing grout.
- Regularly inspect and repair: Take the time to inspect your grout regularly for any cracks or damage. Repairing any issues promptly can prevent stains from developing and extend the lifespan of your grout.
By following these tips, you can help prevent grout stains and keep your bathroom or kitchen looking clean and fresh.
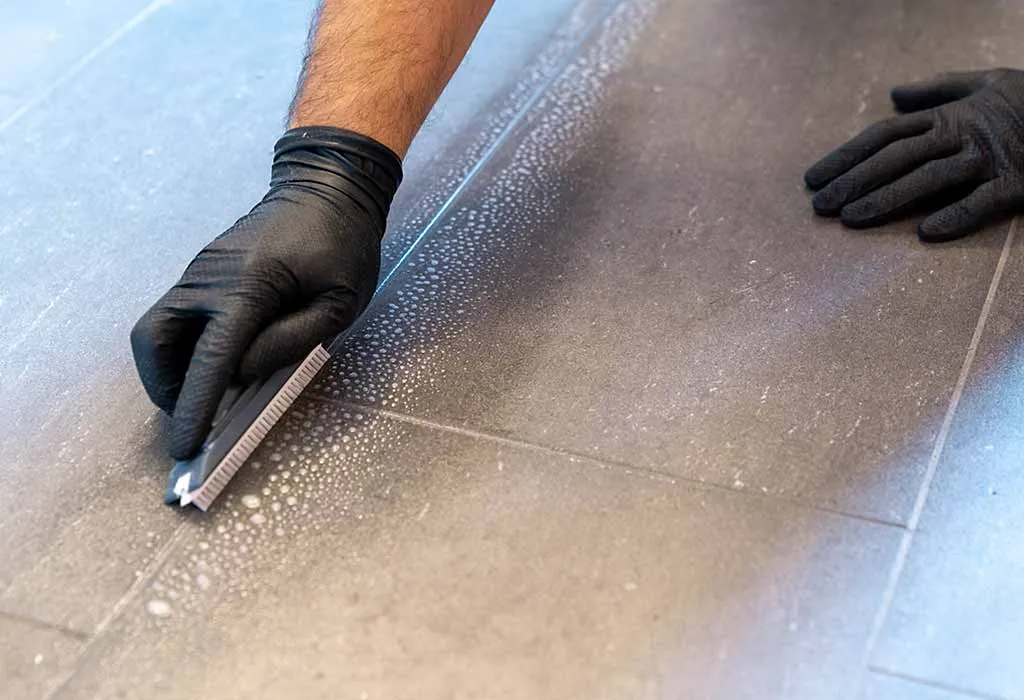
Sealing the grout
After you have cleaned the grout and removed any stains, it is important to seal the grout to prevent future staining. Sealing the grout creates a protective barrier that helps to repel liquids and dirt, making it easier to clean and maintain.
There are different types of grout sealers available, including penetrating sealers and surface sealers. Penetrating sealers are absorbed into the grout, providing a long-lasting and invisible protection. Surface sealers, on the other hand, create a protective layer on top of the grout.
To seal the grout, follow these steps:
- Clean the grout: Before sealing, make sure the grout is clean and free from any dirt or residue. Use a grout cleaner or a mixture of water and vinegar to remove any remaining stains or debris.
- Choose the right sealer: Select a grout sealer that is suitable for your type of grout and tile. Read the manufacturer’s instructions to ensure compatibility.
- Apply the sealer: Use a small brush or a sponge applicator to apply the sealer evenly onto the grout lines. Make sure to cover all the grout thoroughly.
- Wipe off excess sealer: After applying the sealer, wait for the recommended time before wiping off any excess sealer from the tile surface. Use a clean cloth or sponge to remove the excess sealer.
- Allow the sealer to cure: Let the sealer dry and cure for the recommended time before exposing it to water or foot traffic. This will ensure that the sealer bonds properly and provides maximum protection.
It is recommended to reseal the grout every 1-3 years, depending on the amount of traffic and exposure to moisture. Regularly cleaning the grout with a mild cleaner and avoiding harsh chemicals will also help to maintain the seal and prevent stains.
Regular cleaning and maintenance
Regular cleaning and maintenance is essential to keep your kitchen or bathroom floor looking clean and stain-free. By following a few simple steps, you can prevent grout stains and keep your tiles looking like new.
Cleaning Schedule

Establishing a regular cleaning schedule is the first step to maintaining your grout and tiles. Depending on the amount of foot traffic and the level of dirt and grime in your kitchen or bathroom, you may need to clean your tiles and grout once a week or every few weeks.
It’s important to sweep or vacuum the floor before cleaning to remove any loose dirt and debris. This will prevent the dirt from being spread around and getting trapped in the grout.
Choosing the Right Cleaner
When it comes to cleaning grout, it’s important to choose the right cleaner. There are many grout cleaners available in the market, but not all of them are effective in removing stains and dirt.
Look for a grout cleaner that is specifically formulated to remove stains and dirt from grout. Avoid using harsh chemicals or bleach, as they can damage the grout and cause discoloration.
The Cleaning Process

Once you have chosen the right grout cleaner, follow these steps to clean your grout:
- Dilute the grout cleaner according to the manufacturer’s instructions.
- Apply the cleaner to the grout lines and let it sit for a few minutes to loosen the dirt and stains.
- Scrub the grout lines using a grout brush or an old toothbrush.
- Rinse the floor with clean water to remove any residue.
- Dry the floor with a clean towel or mop.
Preventing Stains

In addition to regular cleaning, there are a few preventive measures you can take to minimize grout stains:
- Seal the grout: Applying a grout sealer will help protect the grout from stains and dirt. It creates a barrier that prevents liquids and dirt from penetrating the grout.
- Wipe up spills promptly: If you spill something on the floor, clean it up as soon as possible to prevent it from seeping into the grout.
- Use a doormat: Placing a doormat at the entrance of your kitchen or bathroom will help trap dirt and prevent it from being tracked onto your tiles.
Conclusion
Regular cleaning and maintenance are essential for keeping your kitchen or bathroom floor looking clean and stain-free. By following a cleaning schedule, using the right cleaner, and taking preventive measures, you can prevent grout stains and keep your tiles looking like new.
Video:How to Remove and Prevent Grout Stains Ultimate Guide
Hello, I am Beverly J. Sanders, the voice behind the diverse articles you come across on styves.co.za. My passion lies in exploring the nuances of home improvement and sharing tips that can help you transform your living space into a haven of comfort and style. From the latest trends in home decor to practical cleaning advice, I cover a broad spectrum of topics to cater to a wide variety of interests.
In my recent works, I have delved into the advantages of incorporating a horizontal Murphy bed into your home to save space without compromising on design and functionality. I also explored the benefits of having a free-standing electric fireplace that not only adds warmth to your home but also brings a sleek and modern design to any living space. My articles are a rich resource, offering insights into different products and home improvement strategies that can enhance the quality of your life.
I believe in the power of details; a belief that reflects in my comprehensive guides where I discuss even the overlooked aspects of home decor, such as the impact of baseboard trim in enhancing the overall look and feel of your home. I am constantly on the lookout for innovative solutions and products that can add value to your home and life.
Join me in my exploration as I continue to bring you the latest trends, tips, and insights in the home improvement world. Let’s create a home that is not just a place to live, but a reflection of style and personality.